You have now been exposed to and know all the parts
to creating skins, except for packaging and preparing it for prime time
use. Once you're ready to use your skin on a production DotNetNuke site,
you will want to package and then upload it. In this article, we will
learn how to create a thumbnail for our skin and containers. We will go
over how to pack up our skin into a zip file and how to install a skin
with this zip file. Finally, we will cover how to handle any errors
after applying a skin.
What is Packaging?
Packaging, in regard to
skinning, is the act of putting all of the files that make up the skin
(HTM, CSS, XML, graphic files, etc.) into one zip file. This makes it
easy to move the skin around as a whole and to upload/install it into a
DotNetNuke install. There are essentially two types of packages, one for
the skin itself and one for the container. They can be packaged and
uploaded together or separately.
Is Packaging Necessary?
Packaging your skin
is not necessary to use the skin.
Packaging is also not necessary to move or deploy your skin on another
DotNetNuke install or a different server. For example, once you have
created the folders and a copy of the files
that make up your skin, it is deployed and can be applied to a DNN
portal. If this is true, why then would you want to package your skin?
You will want to package
your skin to make it easy for others to use your skin in their
DotNetNuke portal. It is also easier for you to upload your skin package
to a DNN install rather than using an FTP client to move the files.
How to Package
Packaging skins is so easy, it can be explained in one statement: Zip your files into a file!
Now we'll step through this simple process:
1. Open up Windows Explorer by double-clicking on My Computer on your desktop. You can also find it on the Start menu, under Accessories.
2. Go to your skin in your local DNN install location which should be found at C:\DotNetNukeSkinning\Portals\_default\Skins\FirstSkin.
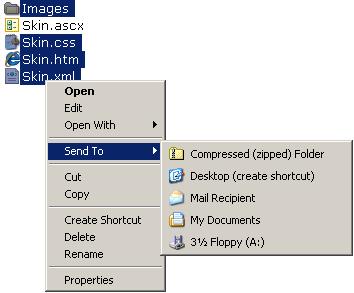
3.
Select all your skin files along with your images folder. Exclude the
ASCX file as this will be generated and will not be needed later on.
4. Right-click on the following selection of items and hover over Send To, then select Compressed (zipped) Folder.
5. That should have created a zip file with the name Skin.zip. Rename it to be DeployedFirstSkin.zip.
6. Now let's zip up the container files into a separate zip file. Go to C:\DotNetNukeSkinning\Portals\_default\Containers\FirstSkin.
7.
Select all your container files along with any images folder. Exclude
the ASCX file as this will be generated and will not be needed later on.
This should have created a file called container.zip. Rename it to be DeployedFirstSkin.zip.
The two files we just
created were your skin and container package files respectively. The
name you give the zip file is the name DotNetNuke will give it when you
upload it to a DNN install. As we already have a skin called FirstSkin and we'll use this same DNN instance to test it on, we renamed it with a different name.
How to Deploy
Let's step through the process you need to deploy this skin package:
1. Click on the Host menu and go to the Skins page.
2. From there, click on the Upload Skin link. This will take you to a page where you will specify the skin zip file.
3. Click browse and select the zip file in the skin directory: C:\DotNetNukeSkinning\Portals\_default\Skins\FirstSkin.
4. Then click Install Skin Package.
5. Click the back button once this is done, or simply navigate back to the Skins Host page.
6. Now we'll deploy our containers package by clicking on Upload Container.
7. Select our zip file from the C:\DotNetNukeSkinning\Portals\_default\Containers\FirstSkin directory.
8. Click the Upload Container Package.
9. Again go back to the Host Skins page and verify that both the skin and the container appear in the appropriate drop-downs.
If you like the idea of creating one package file for both the skin and the container, you can name your skin package as Skin.zip and your container package as. Zip these two files into one file called DeployedFirstSkin.zip. When you upload this one file, DNN will see that it contains both and will parse it appropriately. Container.zip
Creating Thumbnails
What you may have noticed as lacking when you look at our skin and container in the Skins
administrative page is that we have no thumbnail images to represent
them. We need to create simple screenshots of our skin and container and
include them into our packages.
Let's do this now:
1. Go to your Home page in the Internet Explorer and press Alt plus Prt Scr. This will copy the image of the page onto the Windows clip board.
2. Open up a graphics editor like MS Paint. You can use Photoshop if you like to.
3. Crop the image a little to make the appearance better and to just get how the skin looks without the sides of the browser.
4. Save this image as Skin.jpg into our FirstSkin Directory we've been working in. It should be named with the same name of the skin and should also be a JPG.
5. In the Windows Explorer, drag this JPG file onto the ZIP file. This should automatically add this graphic to the ZIP package.
6. Follow the steps from the previous section to redeploy the package.
This time around, the
thumbnail should show up fine. Repeat the above steps for the container
package. You may want to crop further to just include the appearance of
the container, rather than the whole skin.
Handling Bad Installs
There are times when
things don't go right. Typically, this happens much more with new module
installs than skin packages, but you should be ready to handle the
problem if one arises.
Let's say we started using this new skin called DeployedFirstSkin,
and we made some changes to it and needed to upload the package again.
This time, the changes we made were not desirable and possibly caused an
error when DNN processed your ASCX file while rendering your skin.
Because your skin was already applied to the current portal, you may not
be able to get to the administrative Skin page to change the skin to make DNN operable again.
Do not fear! Knowing what we
do about ASCX files, we can simply go into a skin we know is fine and
"copy and paste" the code from its ASCX file into ours or FTP it over
ours. This will make DotNetNuke operable again, so you can go in and fix
the problem with your skin.